

Saturday, April 30, 2011
Project 12 Share
Have you been following along with Project 12? What's Project 12? I blogged about it HERE but in a nutshell it's a easy monthly sketch challenge that will result in a complete “year in review” album at the end of the year. I've been working diligently on mine and have a bunch done but will be sharing them on a monthly basis. Here is my April 2010 layout.
 Do share yours with a link or a pic in an email.
Wednesday, April 27, 2011
Spotlight: My Creative Classroom
My Creative Classroom is an "online arts and crafts learning center. Our interactive and in-depth courses are instructor led and filled with wonderful projects and techniques to help you get the most out of your supplies." Head over and check it out. They have classes from beginner scrapbooking to how-to use your gypsy to copic coloring, etc.
I've only heard good things of them and in fact, am just finishing up a course with them...Sketch Support with Allison Davis and had a great time. Everything went smoothly, I got a ton of pages done and learned a LOT about sketches and how to get the most out of them as well as some great scrapbooking tips. We were given a sketch at the beginning of every week along with a sample page by Allison. She talks about what she did to change the sketch, the thought process, photos placement, embellishment choices, paper choices etc. Each week was a different topic with an assignment and challenge. Once we have finished our assigments, we shared in an online gallery and got feedback from her and everyone else in the class. Sharing and finishing assignments wasn't compulsory. Here's an example from week 4...learning how to embellish.

My interpretation of the sketch...assignment was to create a layout and adjust the title, journaling and/or embellishments to fit what you want to use.
 And here is my assignment challenge layout. The challenge was to "create your own embellishments!" I had a hard time with this and finally settled on stamping the turtle, cutting out a shell from patterned papers and making the turtle x-ing sign from an embellishment I had on hand.
 Happy Scrappin!
I've only heard good things of them and in fact, am just finishing up a course with them...Sketch Support with Allison Davis and had a great time. Everything went smoothly, I got a ton of pages done and learned a LOT about sketches and how to get the most out of them as well as some great scrapbooking tips. We were given a sketch at the beginning of every week along with a sample page by Allison. She talks about what she did to change the sketch, the thought process, photos placement, embellishment choices, paper choices etc. Each week was a different topic with an assignment and challenge. Once we have finished our assigments, we shared in an online gallery and got feedback from her and everyone else in the class. Sharing and finishing assignments wasn't compulsory. Here's an example from week 4...learning how to embellish.

My interpretation of the sketch...assignment was to create a layout and adjust the title, journaling and/or embellishments to fit what you want to use.


Tuesday, April 19, 2011
Spotlight: The Perfect Title
Ever been stumped for the perfect title for your scrapbook page? Hah! I'm always stumped. I browse through magazines, layouts etc and there are always such cool titles. A website that I head to over and over for title ideas is The Perfect Title. They have titles, quotes and sayings. AND the best part is everything is categorized. So easy to search/browse for the perfect title. Enjoy!
Wednesday, April 13, 2011
What's Cooking?
Rav'n Ravioli...a yummy meatless meal that my family enjoys. It's also quick and easy to pull together. It's a recipe from an old Pampered Chef recipe book...Main Dishes (copyrighted in 2000).

Rav'n Ravioli
Ingredients:
1 medium green bell pepper, chopped
1/2 cup chopped onion
1 tsp olive oil
1 garlic clove, chopped
1 (26-28oz) jar of spaghetti sauce
2 packages (9oz each) refrigerated ravioli
1 1/4 cups water
12 French bread baguette slices
1/4 cup butter, melted.
4 oz mozzarella cheese
1 oz fresh parmesan cheese
Preparation:
1. Preheat oven to 400F. Chop bell pepper and onion. Heat olive oil over med-high heat. Add bell pepper, onion and garlic. Cook 2-3 mins or until veggies are tender.
2. Stir in spaghetti sauce, ravioli and water. Bring to a boil and let it simmer ~10 minutes.
3. Slice french bread, melt butter and dip bread slices into butter, tossing to coat evenly.
4. Spoon half of the ravioli mix into a baking pan. Top with mozzarella cheese and the remaining ravioli mix.
5. Arrange bread slices, slightly overlapping around edge of the baking pan. Sprinkle parmesan cheese over bread and ravioli mix.
6. Bake in oven for 15 minutes or until ravioli is heated through and bread is crisp and deep golden brown.
Notes:
- I usually leave out step 1 entirely...my picky eater takes too long picking out all the greens.
- I've left the ravioli on the stove (turned off) and continued with the rest when we got home from practice/game/etc.
- To save a step (and a dirty bowl), I don't melt the butter...just slather it onto the bread slices ;)
Tuesday, April 12, 2011
Spotlight: Imaginisce
Imaginisce is one of my favorite scrapbooking manufacturers and at Winter CHA, I think they outdid themselves with these TWO lines...Happy Camper and Berrylicious. Both lines have yet to hit the stores and I can't wait to get them in stock. Click on the links and check them out...then come back here, leave me a comment on which one you like better and if you would like to be able to pre-order either of these packs.


Tuesday, April 5, 2011
Spotlight: Sketch Savvy Blog
Another sketch related spotlight...Sketch Savvy. Can you tell I love sketches? This blog is maintained by Susan Stringfellow and looks like she posts a sketch plus sample layouts on a daily basis. Occasionally there are also SCAL (Sure Cuts A Lot) cut files that can be used with the cricut machine.
 I have been scrapping at home the last few weeks and am going to attempt a layout today using Sketch Savvy's sketch for today. I'll share here once I get it done. update: layout done. I managed to even dig through my stash and use some really old stuff I've been hanging on to for way too long!!!


Friday, April 1, 2011
Just Scrappin' Weekend in Westboro

Join us for a scrapbooking weekend filled with scraps, laughs and friends
at the Doubletree Inn, Westborough, MA
from September 9 - 11, 2011
Your crop fee includes…
- Crop Room open beginning Friday at 4pm and close on Sunday at 4pm.
- We will close the crop room from 3am -7am to get some sleep.
- 2 night accommodations
- Saturday morning breakfast
- Saturday dinner buffet
- Sunday brunch
- A 6’ x 30” table all to yourself
- Full use of Tool Table – 2 Cricuts, Big Shot, and more!
- Free Make and Take
- On-site shopping
- Welcome gifts, door prizes, games and daily challenges
- On-site massage therapist (for an additional fee)
Rates:
$375 single occupancy
$275 per person, double occupancy
A $75 non-refundable deposit will hold your space!
Deposit is due by April 30, 2011
Full payment is due by August 1, 2011.
For more information, contact:
The Crop Shop - Jean Laporte jean.lee@snet.net, 860-490-0463
Time2Scrap – Siewleng Hiraldo sluvs2skrap@yahoo.com, 508-363-3836
Thursday, March 31, 2011
Project 12 Share
Here are my Project 12 layouts as promised. What's Project 12? I blogged about it HERE but in a nutshell it's a easy monthly sketch challenge that will result in a complete “year in review” album at the end of the year. Here is my January 2010 layout...

February 2010 layout ...

and March 2010 layout ...

I'm looking forward to seeing your layouts. Leave a comment with a link or send me an email with the layout attached.
February 2010 layout ...

and March 2010 layout ...

I'm looking forward to seeing your layouts. Leave a comment with a link or send me an email with the layout attached.
Wednesday, March 30, 2011
Siewleng's April Scrappy News
Good Morning all!
I know it’s not quite April yet but I am going to be away at Cool Crops Portland on April 1st and wanted to get a jumpstart. I have been scheming and plotting for a month and am bursting to tell you guys all about it. Are you ready for it?...*drumroll please*...Jean and I are hosting a...
Just Scrappin' WEEKEND CROP
September 9 - 11 at The Doubletree Inn, Westboro, MA
September 9 - 11 at The Doubletree Inn, Westboro, MA
For more info, email me (sluvs2skrap@yahoo.com)
Now back to the regularly scheduled program...
1. I have one class at the Holden Rec Center this month. A sneak peek of the class can be found HERE.
April Showers Card Class
Let’s create 5 unique all occasion cards using paints and mists. Be prepared to get your hands dirty.
Class date: 4/14 (6:30 – 8:30pm) Cost: $20
2. Bazzill Bulk Buy
10 colors, 5 sheets of each = 50 total for a great price of $23.00. Deadline to order is Monday, April 4 at noon. Colors are Evening Surf, Mexican Poppy, Lime Sherbet, Maraschino, Cashmere, Citrus, Smokey, Cream Puff, Dawn and Impatiens. More details can be found HERE.
3. Just Scrappin' in Sturbridge2. Bazzill Bulk Buy
10 colors, 5 sheets of each = 50 total for a great price of $23.00. Deadline to order is Monday, April 4 at noon. Colors are Evening Surf, Mexican Poppy, Lime Sherbet, Maraschino, Cashmere, Citrus, Smokey, Cream Puff, Dawn and Impatiens. More details can be found HERE.
Our next crop is April 9 and there are limited seats left if you'd like to attend. $40 gets you a seat, lunch, dinner, snacks, drinks, a welcome gift, as well as awesome games with prizes to be won. Future dates are May 14 and June 4. Contact me for more info.
4. Special Requests
This month, I can be found at two Cool Crops events, Portland and the Cape. I will also have my store at our Just Scrappin' event in Sturbridge and at the Scrappin' Sistas crop in Plymouth. If there is anything you need or would like to have, feel free to email me and I can get it for you or have on stock for you for that event. Not attending any of these events? Stop by to say "HI" if you're in the area.
5. Last but not least, if you haven't yet head over to Facebook and like Time2Scrap. We'll have a fun giveaway when Time2Scrap reaches 100 likes!!!
Tuesday, March 29, 2011
Spotlight: Bazzill Matchmaker
What do you grab first when you start a layout? For me it's the photos, then the patterned papers and then the difficult process of finding cardstock that matches my patterned papers. Lately, I've started adding cardstock to the paper packs I carry to make it a little easier and time-saving for you, my customers. After all, I am all about maximizing your scrapping time. This week's spotlight is a website by Bazzill (my all-time favortite cardstock manufacturer) called BAZZILL MATCHMAKER...it has (almost) all the paper lines and their matching cardstock colors!!! You read right...the paper lines and their matching Bazzill colors. Check it out and let me know what you think! And if you have to have a certain color, let me know too and I'll add it to my bazzill stash.
And if you haven't had enough of Bazzill, I am taking orders for my next Bazzill Bulk Buy. Here is a pic of the colors
 and here is the nitty gritty...
A Bazzill Bulk Buy is an opportunity to stock up on Bazzill paper at a reduced price.
And if you haven't had enough of Bazzill, I am taking orders for my next Bazzill Bulk Buy. Here is a pic of the colors

A Bazzill Bulk Buy is an opportunity to stock up on Bazzill paper at a reduced price.
- The cost of this quarter's buy is $23.00
- The colors are (see photo)...
- Evening Surf - blue
- Cream Puff - neutral
- Maraschino - red
- Dawn - pink
- Lime Sherbet - green
- Citrus - orange not shown in photo
- Impatiens - purple not the sample shown in photo, it's a lighter purple (almost sorta like the one next to the red sample)
- Mexican Poppy - yellow
- Cashmere -brown
- Smokey -grey
- You will receive 50 sheets of Bazzill cardstock in 10 different colors. 5 sheets of each color.
- Price includes shipping to me and tax.
- Price is for local hand delivery only - It does NOT include shipping to you. We can meet up or deliver at an event (check my schedule here). Mailing from me to you is an additional $7.50 via USPS.
- Order Deadline is noon Monday 04/04/11.
Monday, March 28, 2011
April Classes at the Holden Rec Center

A busier month this month so only 1 class, but it's one you don't want to miss.
April Showers Card Class
Let’s create 5 unique all occasion cards using paints and mists. Be prepared to get your hands dirty.
Class date: 4/14 (6:30 – 8:30pm) Cost: $20
The Fine Print
- All classes are taught at the Holden Recreation Center in Holden, MA.
- You have to call them at 508-829-0263 to reserve your seat.
- If there are not enough students, the classes will be canceled. So make sure you bring some friends with you ;)
- Space is also limited, so call and register early.
- Please bring adhesive (tape runner is preferred), mini glue dots, 12’ paper trimmer and scissors. All other materials and tools will be provided.
- Question? Leave a comment and I will reply in the comments section.
Thursday, March 24, 2011
What's Cooking?
Stuffed Shells...a freezer meal that has become a fave of ours. I found the recipe at "A Bear in the Kitchen" blog a while back after hopping from blog to blog. I love that I spend an hour in the kitchen prepping the shells and get TWO meals out of it. Enjoy!
Stuffed Shells (Freezer Meal)
1 package of jumbo shells (40)
4 cups or 2 lbs small curd cottage cheese (or ricotta)
2 cups shredded mozzarella cheese
3/4 cup fresh grated Parmesan
2 eggs
1 tablespoon chopped fresh parsley
1 tablespoon chopped fresh basil
3/4 teaspoon dried oregano
1/2 teaspoon salt
1/4 teaspoon pepper
2 jars spaghetti sauce - one now, one for later
Preparation:
Cook jumbo shells for half the recommended time on the package, until just limp. Drain and cool in a single layer on a cookie sheet covered with wax paper.
Combine cheeses, eggs, parsley, basil, oregano, salt, and pepper; scoop mixture into a ziplock bag and snip one of the corners off the bag and use like an icing bag to fill each shell with about 2 tablespoons of filling. Lay shells back on wax paper covered cookie sheets and freeze. Once shells are frozen put into ziplock bags (2 bags with 20 shells is how I portion it out).
Cooking Instructions:
Thaw shells and spaghetti sauce in the fridge overnight. Spray a 9x13 baking dish with cooking spray. Spread 1/2 cups sauce on the bottom of the dish. Arrange shells on top of sauce and pour remaining sauce evenly over the shells. Cover with foil and bake at 350 for 35 minutes. Uncover and if desired sprinkle with some shredded mozzarella cheese and parmesan; return to oven for a few minutes until cheese melts. Remove from oven and allow to stand for about 5 minutes before serving.
Notes:
- to cook from frozen, follow directions as above (just using frozen shells instead of thawed) and increase cooking time to 1 hour.
- this recipe either makes 1 or 2 meals depending on your family size. I do 20 shells in a 9x13 pan with 1 jar of sauce for my family of 4 served with garlic bread and fresh salad.
- perfect for meatless Mondays and Fridays
Wednesday, March 23, 2011
Beyblade Birthday Party
As requested, here is the nitty gritty of my little guy's Beyblade Bash to celebrate his 9th birthday. The details for the invite are HERE. Armed with this handy dandy rule book and with the help of my boys we came up with the coolest party ever, if I do say so myself ;)

We set up our living room with the 3 battle arenas they had, and hung up streamers with Arena 1, 2 and 3 labels on them so the competitors would know where to go. I stayed with the primary colors, red blue and yellow.

The boy and I spent over an hour coming up with the battle schedule. We had a regular season - everyone battled each other, followed by the playoffs and ending with a championship game. The regular season was spread out over the 3 arenas. Each contestant battled in an arena no more than 3 times. Each battle also had a referee...contestants that didn't have a battle at the time and a Dad where needed. Battles in the same slot started at the same time so those that finished early could watch the other battles. AND each battle was best of 3 to make it more interesting. Here is my master schedule with the referees handwritten in on the side.

To make it smoother and easier for the contestants, each one also received a laminated copy of their schedule. Laminating was done using the Xyron 510 machine and its laminating cartridge.
 |
| Battle Schedule |
 |
| Playoff brackets |
The cake - the Bakugan colors were perfect so I had the bakery at Walmart make me a cake following the Bakugan theme without the toys and added my own. I cut out the Beyblade logo from a Beyblade toy package and added a real Beyblade on the cake.

Last but not least, I bought a trophy from Target's dollar spot and decked it out with a Beyblade print.

For more on the party, go HERE.
Tuesday, March 22, 2011
Spotlight: Page Maps
The spotlight of this week is one my all time favorite sites to head to for sketches. I have been reading/using the sketches from this site from way back when. If you haven't heard of the website or blog, I'm sure you've seen their books.

Head on over to the Page Maps website and check out all of their cool free sketches. They also have a Page Maps blog that has contests all year long. Here is an excerpt from their welcome page...
Head on over to the Page Maps website and check out all of their cool free sketches. They also have a Page Maps blog that has contests all year long. Here is an excerpt from their welcome page...
Yo sketch dawgs! Welcome to PageMaps, a sketch resource for scrapbookers and page artists. We all hit a creative wall from time to time, staring at piles of photos, papers and embellishments, wondering how to put it all together. (For me, it's usually a double semi truck and I don't stand a chance.)But with a click of the mouse, inspiration is yours to find among the many sketches found here at PageMaps—from graphic and shabby to linear and asymmetrical—there's sure to be a map that fits your style. And hey, if there isn't, just turn one of those suckers on its side or upside down! Cardmakers will also find a collection of designs just in time for that last-minute birthday card. After all, does Hallmark really need your hard-earned $3 bucks? Personally, I'd rather buy a latte (double shot, hold the foam, please).PageMaps are free for you to download and print for your personal use, but please read the {yawn} Terms of Use to make sure I don't have to send one of my friends after you for map violations. I know this dude, Guido, and he's running a special on knee caps this month...
Monday, March 21, 2011
Project 12 update
There are ten more days to the end of March. How are you doing on your Project 12 challenge? Anyone decided to jump on the bandwagon with me on this? I have January and February done. Planning on working on March and maybe even April at an all day crop* at the Greendale People's Church this Saturday. If you haven't started, there's still time to get on board. I'd love to see what you have :)
*side note: there are seats available at this no-frills all day crop. Interested? Email me for more info!
*side note: there are seats available at this no-frills all day crop. Interested? Email me for more info!
Tuesday, March 15, 2011
Spotlight: Jillibean Soup Blog
Got in my order from Jillibean Soup just this week and their stuff is so much better in person!!! I am desperately trying to carve out some time to play with their new line Spotted Owl. My spotlight for this week is their blog, aptly named Bean Talk, that is filled with ideas and inspiration for layouts, cards and more. The following images are from the Jillibean blog. Love love the simplicity of this layout. I am so scraplifting this...
 and this one.
 My little guy is turning 9 on Friday...I think I may have to burn the midnight oil to make one of these for him!!!


Thursday, March 10, 2011
What's Cooking?
Awesome Slow Cooker Pot Roast...another slow cooker family favorite. Something that takes 30minutes prep in the morning, delicious smells all day and another 30 minutes to make the sides. A recipe from the All Recipes website. Enjoy!
Awesome Slow Cooker Pot Roast
Ingredients
- 2 (10.75 ounce) cans condensed cream of mushroom soup
- 1 (1 ounce) package dry onion soup mix
- 1 1/4 cups water
- 5 1/2 pounds pot roast
Directions
- In a slow cooker, mix cream of mushroom soup, dry onion soup mix and water. Place pot roast in slow cooker and coat with soup mixture.
- Cook on High setting for 3 to 4 hours, or on Low setting for 8 to 9 hours.
1. I sometimes use a combo of cream of chicken and cream of mushroom...it all depends on what's in the pantry.
Wednesday, March 9, 2011
Beaming!
That would be me here in my scrap cave. Positively beaming! I've been messing around with Photoshop Elements for a while, learning through tutorials and trial and error. Today my little guy decided he had to have a Beyblade themed birthday party...and if you have a 9 yr old boy around, you know it's all the rage but there are no easy party supplies out there. Challenged with that, I decided to photoshop an invite, using images I copied off of their website. I'm pretty sure that's kosher as long as I am not selling the invites. I grabbed the background, an image (that I had to tediously cut out from the background), added some text and voila!


Tuesday, March 8, 2011
Spotlight: Ella Publishing Co.
Ella Publishing Co. is a website that has "Scrapbooking ideas, photo tips, journaling help, and more—it’s all right here! You’ve found the world’s top source for scrapbooking eBooks, which you can read on your computer or iPad or print for your inspiration collection. Also enjoy our FREE weekly eZine and daily blog."
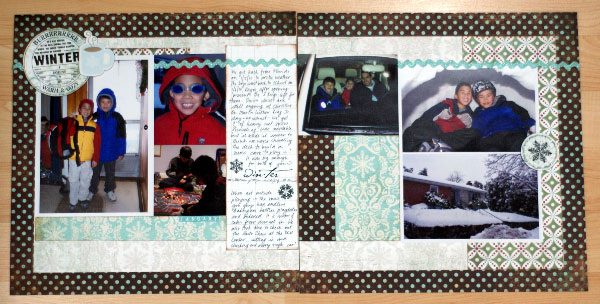
They also have a blog that has great tips and ideas. This post, I'd like to highlight a series of posts about stitching on layouts. There are ideas and how-to's on machine stitching, hand stitching and faux stitching. I personally have tried them all and find that faux stitching is the easiest method although I do like the look of hand stitching and machine stitching. Here are some layouts that I've done using the three different techniques.
They also have a blog that has great tips and ideas. This post, I'd like to highlight a series of posts about stitching on layouts. There are ideas and how-to's on machine stitching, hand stitching and faux stitching. I personally have tried them all and find that faux stitching is the easiest method although I do like the look of hand stitching and machine stitching. Here are some layouts that I've done using the three different techniques.
 |
| Machine stitching around the border |
 |
| Faux stitching |
 |
| Hand stitching on a title page to show our flight path :) |
Thursday, March 3, 2011
What's Cooking? Chicken Spaghetti
In an effort to make more time for scrapping and making memories, I started using my slow cooker/crock pot more. I haven't quite learned to adapt recipes for the slow cooker but I have found some really great ones online and in recipe books. It occurred to me that maybe I should share these finds with my readers..I do get lightbulb moments once in a blue moon. I can't guarantee that I'll have a new recipe share every week as I tend to head for my go to recipes quite a bit. And to make it easier to find these recipes, I will add a page (see top of the page) that will have them all linked. Enjoy!
Slow Cooker Chicken Spaghetti - found over on the Clover Lane blog
Ingredients:
Slow Cooker Chicken Spaghetti - found over on the Clover Lane blog
Ingredients:
2 boneless, skinless chicken breasts
1 cup water
1 packet of dry Italian dressing
1 can of cream of chicken soup (I use the 98% fat free kind)
1 bar or container of cream cheese (I use 1/3 fat free cream cheese)
1 box of pasta (I prefer thin spaghetti)
In crock pot:
Pour water, dry Italian dressing mix and cream of chicken soup into crock pot.
Stir together to mix. It will be lumpy, don't worry about it.
Add in chicken...it should land at the bottom of the pot.
Add in cream cheese...I leave the whole block sitting on the top of everything.
Cook on high for 4 hours or low for 6 hours.30 minutes before chicken is done, cook a box of thin spaghetti pasta.
Spoon chicken mixture over top on individual plates, serve with garlic bread and salad. Enjoy!
Notes:
I've used less than a whole bar of cream cheese, even down to half and can't tell the difference.
Cook pasta ahead and rinse in hot water (from tap) just before serving.
Subscribe to:
Posts (Atom)